?? ??? ?? ?? ??? ????? ???? ?? ???? ?? ??? ???? ?? ??? ??? ???? ? ?? ??? ???? ????? ?? ???? ?? ??? ?? ??? ??? ??? ????, ?? ???? ??? ??? ?? ??? ? ??? ??? ???? ?????. ?? ??? ?? ?? ???? ??? ?? ??? ?? ??? ???? ??? ??? ??? ??????.
If the machining allowance is too small, it is difficult to eliminate the residual form and position errors and surface defects in the previous process; If the allowance is too large, it will not only increase the workload of machining, but also increase the consumption of materials, tools and energy. What is more serious is that the heat generated by cutting a large amount of machining allowance during the machining process will deform the parts, increase the machining difficulty of the parts and affect the product quality. Therefore, it is necessary to strictly control the machining allowance of the parts.
1. Concept of machining allowance
Machining allowance refers to the thickness of the metal layer cut from the machined surface during machining.
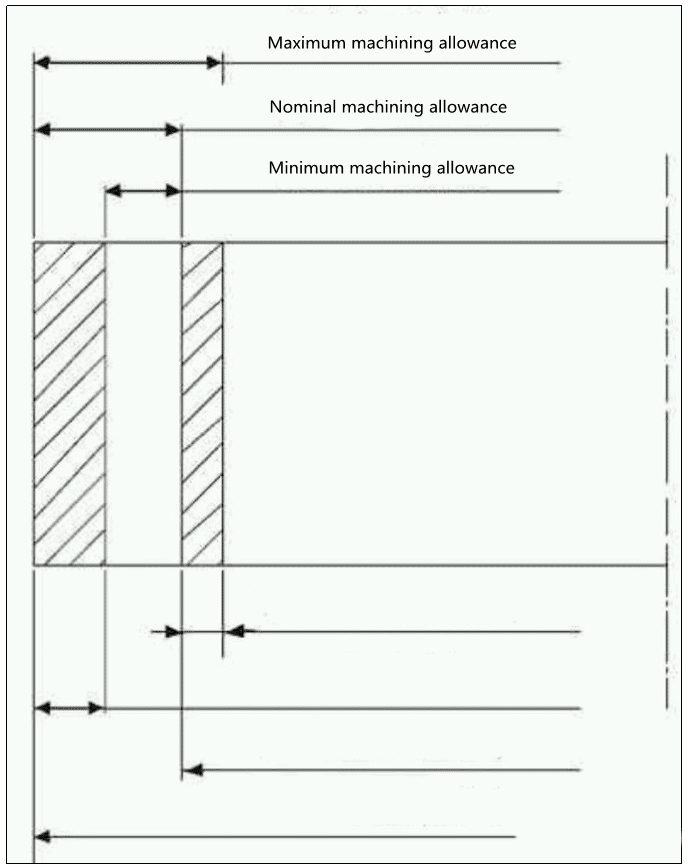
Machining allowance can be divided into process machining allowance and total machining allowance. Process machining allowance refers to the thickness of the metal layer cut off by a surface in a process, which depends on the difference between the dimensions of the adjacent processes before and after the process. Total machining allowance refers to the total thickness of the metal layer removed from a certain surface during the whole machining process of the part from blank to finished product,which is, the difference between the blank size on the same surface and the part size. The total machining allowance is equal to the sum of the machining allowance of each process.Machining allowance in a drawing are shown in Figure 1.
In the figure 1, the minimum machining allowance is the difference between the minimum process size of the previous process and the maximum process size of this process. The maximum machining allowance refers to the difference between the maximum process size of the previous process and the minimum process size of this process.
The variation range of process machining allowance (the difference between the maximum machining amount and the minimum machining allowance) is equal to the sum of the dimensional tolerances of the previous process and the current process. The tolerance zone of process dimension is generally specified in the entry direction of parts. For shaft parts, the basic size is the maximum process size, while for holes, it is the minimum process size.

2How does machining allowance affect processing accuracy?

2.1 when the machining allowance is excessive
Parts must produce cutting heat in the machining process. Part of these cutting heat is taken away by iron filings and cutting fluid, part is transferred to the tool, and part is transferred to the workpiece, which increases the temperature of the parts. The temperature is closely related to the machining allowance. With large machining allowance, the rough machining time will inevitably increase, and the cutting amount will also be appropriately increased, resulting in the continuous increase of cutting heat and the temperature of parts. The biggest harm caused by the temperature rise of parts is to deform the parts, especially for materials that are sensitive to temperature changes (such as stainless steel), and this thermal deformation runs through the whole processing process, increasing the processing difficulty and affecting the product quality.
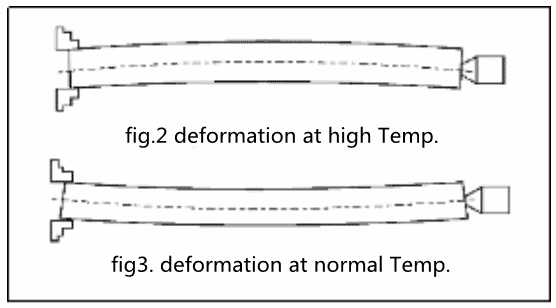
For example, when machining slender shaft parts such as screw rods, the degree of freedom in the length direction is limited due to the one-on-one machining method. At this time, if the workpiece temperature is too high, thermal expansion will occur. When the extension in the length direction is blocked, the workpiece will inevitably produce bending deformation under the influence of stress, which will bring great trouble to the later processing. The bending deformation diagram of the workpiece after heating is shown in Figure 2. At this time, if you continue to process, process the protruding part until the finished product. After cooling to normal temperature, the part will produce reverse deformation under the action of stress, causing form and position errors and affecting the quality. The bending deformation diagram of the workpiece after normal temperature is shown in Figure 3. After expansion in the diameter direction, the increased part will be cut off, and cylindricity and dimensional error will occur after the workpiece is cooled. When grinding precision screw, the thermal deformation of workpiece will also cause pitch error.
2.2 what if the maching allowance is too small?
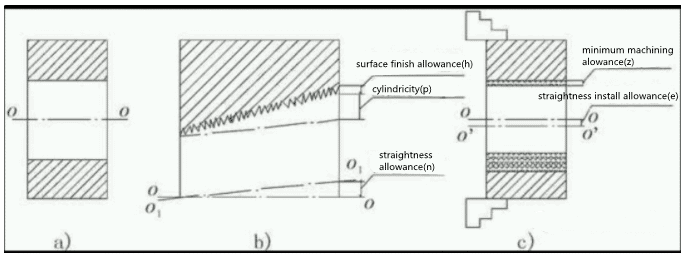
The machining allowance of parts should not be too large but also too small. If the machining allowance is too small, the residual geometric tolerances and surface defects in the previous process cannot be eliminated, thus affecting the product quality. In order to ensure the machining quality of parts, the minimum machining allowance left in each process shall meet the basic requirements of the minimum machining allowance in the previous process. The schematic diagram of the constituent factors of the minimum machining allowance of the inner hole of a part is shown in Figure 4. Figure 4a) shows the parts of the inner hole to be machined. If the axis o1-o1 deviates from the reference axis O-O with position error n when the hole is processed in the previous process, and the cylindricity error P (such as taper, ellipse, etc.) and surface roughness error H (as shown in Figure 4b) exist in the inner hole, in order to eliminate the geometric tolerance before boring, the minimum machining allowance on one side of the boring process should include the values of the above errors and defects. Considering the inevitable installation error of the workpiece during boring in this process, that is, the error E (as shown in Figure 4C) between the original hole axis O-O and the rotation axis O ‘- o’ after workpiece installation, and the dimensional tolerance T during boring in this process, the minimum machining allowance Z of this process can be expressed by the following formula:
Z≥t/2+h+p+n+e (side allowance)

Fig. 4 diagram of components of minimum machining allowance
For different parts and different processes, the values and forms of the above errors are also different. When determining the process machining allowance, it should be treated differently. For example, the slender shaft is easy to bend and deform, and the linear error of the busbar has exceeded the tolerance range of the diameter dimension, and the process machining allowance should be appropriately enlarged; For the process of machining with floating reamer and other tools to locate the machining surface itself, the influence of installation error E can be ignored, and the process machining allowance can be reduced accordingly; For some finishing processes mainly used to reduce surface roughness, the size of process machining allowance is only related to surface roughness H.
3.principles to select machining allowance for parts
The selection of machining allowance of parts has a great relationship with the material, size, accuracy grade and machining method of parts, which needs to be determined according to the specific situation. The following principles must be followed when determining the machining allowance of parts:
(1) The minimum machining allowance shall be adopted in order to shorten the machining time and reduce the machining cost of parts.
(2) Sufficient machining allowance shall be reserved, especially for the final process. The machining allowance shall ensure the accuracy and surface roughness specified on the drawing.
(3) When determining the machining allowance, the deformation caused by the heat treatment of the parts should be taken into account, otherwise scrap may occur.
(4) When determining the machining allowance, the machining method and equipment as well as the possible deformation in the machining process should be considered.
(5) The size of the machined parts shall be taken into account when determining the machining allowance. The larger the part, the larger the machining allowance. Because when the size of the part increases, the possibility of deformation caused by cutting force and internal stress will also increase.
4 Conclusion
In the actual production, the manufacturing methods of many parts are temporarily determined, such as: the centrifugal cast stainless steel sleeve is rolled and welded with steel plate; The cooler end cover, motor base and gear box sanding parts are replaced with weldments, etc. There are many uncertain factors in the manufacturing process of these parts, and its shape error is difficult to predict. Therefore, the three methods introduced in this paper to determine the machining allowance of these parts are not applicable to the determination of machining allowance of these parts, and can only be flexibly mastered in the actual manufacturing process.


